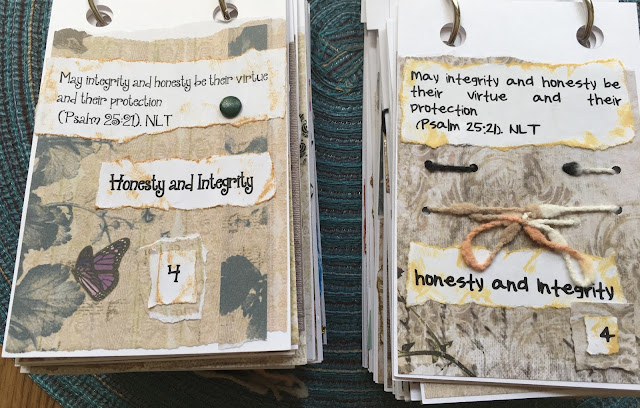
The Covers for the Prayer Flip-Chart
This post will show two examples of the
Prayers for My Children
that I made last week.
Finally got one done for third daughter- Sara.
Then one for her dear sweet friend Megan-
a brand new mommy.
Here is the dedication page-
for the Wilsons and the Schmitz family.
I will show the daily prayer pages-
side by side.
All 31 days.
I tried to use a collage app to
shorten the post,
but then only one shows up well.
I had been asked to give them as examples
for those who have a challenging time
coming up with a page design
and just wanted a guide.
I started with 6 pages of
coordinating scrapbook paper.
Then I cut them into strips just an 1/8 of inch
smaller than the calendar page.
I tear the words of the printed sheets
and add a bit of distress ink to the edges.
(KEY- you can tear the strips of words so they are ready to go
but keep each set of words, number,
and prayer verse together-
or else it is a big mess to sort out.
SO do this as you go along....)
(KEY- you can tear the strips of words so they are ready to go
but keep each set of words, number,
and prayer verse together-
or else it is a big mess to sort out.
SO do this as you go along....)
If you are a straight-edge
kind of person you can do that too.
Distress ink just looks
really cool on TORN edges.
The order of the day was to keep it simple-
in order to complete the project.
The scrapbook paper
can also be torn to fit the calendar page.
I move through and do all the pages first.
Washi tape makes an easy addition for variety.
There is no right or wrong way
to do this project.
The calendars are printed in 3 different fonts
and can be found in the FILES section here:
Visual Faith Community- DC Metro
You don't have to 'be on" Facebook to get to this files.
If you have trouble- contact me on this blog and I can email them to you.
But, you have to give me your email.
Visual Faith Community- DC Metro
You don't have to 'be on" Facebook to get to this files.
If you have trouble- contact me on this blog and I can email them to you.
But, you have to give me your email.
We have the calendars sets
made at a local printer.
I tried making them myself.
There were a mess to line up and get straight
and the holes punched?
Not so easy to have it look professional.
The basic card is white cardstock here.
You could also use other neutral colors.
It measures- 3 1/2 by 5 1/2 inches.
I added a page in each calendar
with some vintage images
from IDEALS magazines from the 1940's.
Two blank pages are in each set to add photos
of the children you are praying for each day.
When done you can go back
and add all sorts of doo-dads,
paper clips, brads, ribbon, stamps, yarn.
I love this project
because it stands up by itself.
Now that it is finished-
simply pray each day for your children,
their spouses if married, and grandchildren,
and great-grands.
Right into the next generation,
day after day after day,
And then next month- start again.
Pray with intention.
Pray with a tool
that helps you be accountable.
Pray and believe that the Holy Spirit
guides your heart in prayer.
May this BLESS your family.


Hi Connie, Wondering if I can find the praying for your children PDF anywhere other than on Facebook? Thank you so much for showing how you make the calendars! Bev Teichrob
ReplyDeleteBev- I need your email and I can send them to you- use the contact form here on the blog to reach me----
Deletethe document for this is now up in resources at www.visualfaithmin.org and so are many other resources!
DeleteI love this and think it is beautiful and brilliant! Thank you for sharing!
ReplyDeleteI love distress ink but what do you use to put it on the paper to create a simple edging. I use the round sponge makeup teardrop shapes things and they still leave an edge. Thanks so much Carolin
ReplyDeleteBecause I always have a torn edge I simply hold the piece of paper with my left hand and apply the ink with the right-- holding the distress pad at an angle- I just "go around " the edges - it isn't a "perfect" product when finished but that is how I was taught to add the ink-- I have used the sponge brushes and it does have a softer look-- this might be a bit brighter because it is directly on the paper
Delete